Otter supports SAML-based single sign-on (SSO) with Microsoft Entra ID (formerly Azure Active Directory (AD)), enabling enterprise users to sign in through Microsoft’s identity platform. This article explains how to configure SSO in Otter using Entra ID, including required SAML configuration and common issues.
Step 1: Create the SSO Enterprise App in Entra
- Sign in to Microsoft Entra. Navigate to Enterprise apps. Click New application.
- Click Create your own application.
- Create your application. Click Create to proceed.
- Name the application (e.g., Otter.ai SSO)
- Select Integrate any other application you don't find in the gallery (Non-gallery)
- Once the application has been created. Click Set up single sign on.
- Select SAML.
Step 2: Set up Single Sign-On
Follow the steps below to set up SSO.
Know your Team Handle ✨
Before starting, copy your Team Handle.
- Navigate to Manage Workspace > Settings.
- Under SAML Authentication, click Configure.
- Each Workspace will have its own unique team handle. Click Copy to copy your Workspace's team handle.
yourhandle with your team’s handle (e.g., https://otter.ai/saml/yourhandle → https://otter.ai/saml/workspace-team-handle-entra).1) Basic SAML configuration
- Edit Basic SAML Configuration.
- Click Add identifier and Add reply URL.
-
Add the following URLs, replacing yourhandle with your Team Handle obtained in Step 1. Click Save when finished.
-
Identifier (Entity ID):
https://otter.ai/saml/metadata/yourhandle -
Reply URL (Assertion Consumer Service URL:
https://otter.ai/saml/yourhandle
Note: Otter does not require Sign-on URL, Relay State, or Logout URL. These fields can be left blank. -
Identifier (Entity ID):
-
✅ Basic SAML Configuration is complete.
2) Attributes & Claims
Follow the steps below to ensure the correct attributes & claims are added.
- Edit Attributes & Claims.
- Click into Unique User Identifier (NameID). Edit the following settings, then click Save.
-
Name identifier format:
Persistent -
Source attribute: A unique, permanent identifier for the user (e.g., employee ID). Learn more about selecting a NameID in our FAQs.
Note: Avoid using email addresses for your NameID attribute. Email addresses can change over time, leading to duplicate accounts.
-
Name identifier format:
- Click into user.mail claim. Edit the following settings, then click Save.
-
Name:
email - Namespace: Leave blank
-
Name format:
Unspecified -
Source attribute:
user.mail
-
Name:
- Click into user.givenname claim. Edit the following settings, then click Save.
-
Name:
first_name - Namespace: Leave blank
-
Name format:
Unspecified -
Source attribute:
user.givenname
-
Name:
- Click into user.surname claim. Edit the following settings, then click Save.
-
Name:
last_name - Namespace: Leave blank
-
Name format:
Unspecified -
Source attribute:
user.surname
-
Name:
- Delete the user.userprincipalname claim under Additional claims. It is not needed.
-
✅ Attributes & Claims setup is complete.
3) SAML Certificates
- Download Certificate (Base64).
- Once the file has downloaded. Open the certificate to view the content. Copy the certificate.
4) Set up Otter.ai SSO
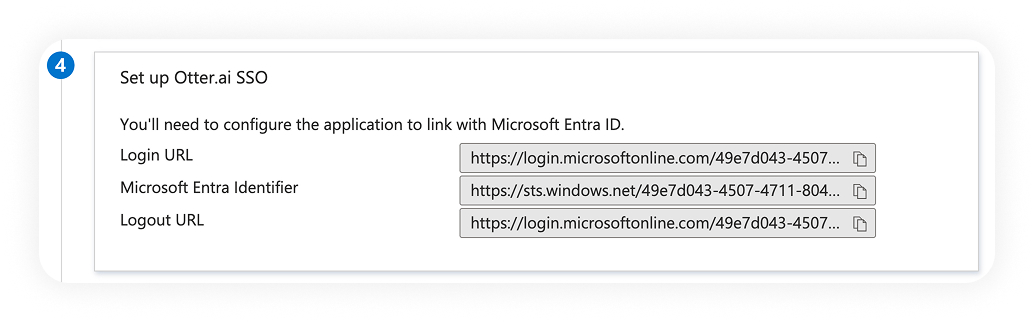
Configure the SSO settings on Otter's side.
- Navigate to Manage Workspace > Settings.
- Under SAML Authentication, click Configure.
- Fill out the fields using the info generated by your IdP.
- Login URL → SAML Endpoint
- Microsoft Entra Identifier → Identity Provider Issuer
- Certificate content → Public Certificate
- Click Save and Test.
Step 3: Enable SAML
Once testing is complete and everything looks correct, toggle Enable SAML on for your workspace. You’ll have two options when enabling SSO:
- Allow other login options: SSO is optional; team members can continue using their preferred sign-in methods. Recommended during the testing phase to ensure uninterrupted access.
-
Require SSO for all Team members: All team members must sign in using SSO. Other sign-in methods are disabled.
If your organization uses assignment-based access, ensure the required users and groups are assigned to the Otter SSO enterprise application.
⚙️ Manage your application properties in Entra
Review and adjust the following application properties as needed:
-
Enabled for users to sign in: Set to
Yesfor users to be able to authenticate into Otter using SSO. - Logo: Optionally add a logo to make the application easier to recognize. The Otter logo is available at the bottom of this article.
-
User access URL: Share this link with team members for direct access. It supports both signing in and creating a new account through just-in-time (JIT) provisioning.
Tip: Team members can also access the Otter SSO application through Microsoft My Apps. - Assignment required: Review this setting to control access by assigning specific users or groups.
-
Visible to users: Set to
Yesif you want the application to appear in Microsoft My Apps.
🔐 Member SSO flow
Members who have been added to or have access to the SSO flow can sign in to Otter in various ways.
Click Continue with Microsoft on the Otter sign-in page.
Click on the Otter.ai SSO application in Microsoft My Apps.
FAQs
Where can I learn more about SSO?
- Check out our general guide on setting up SSO.
Does Otter support Identity Provider (IdP) Just-In-Time (JIT) provisioning through Entra?
- Yes.
- New users can click on the Otter.ai SSO application in Microsoft My Apps. An account will be created, and the user will be automatically added to the Workspace.
Does Otter support Service Provider (SP) Just-In-Time (JIT) provisioning?
- Contact your Otter account manager to get started.
Do I need to assign users or groups to the application?
If your organization uses assignment-based access, ensure the required users and groups are assigned to the Otter SSO enterprise application.
Why are Sign on URL, Relay State, and Logout URL left blank?
Otter does not require these fields for SAML SSO.
- Sign-on URL is optional and not needed for Otter’s SSO flows
- Relay State is not used by Otter
- Logout URL is optional because SAML single logout (SLO) is not supported
Leaving these fields blank helps avoid configuration errors.
What's a good example of a NameID?
✅ Recommended: 9f3a2c71-84e2-4c1d-a8e1-3f6b92a01d77
A good NameID should:
- Uniquely identify one user
- Remain consistent across logins
- Never be reassigned to a different person
🚫 Not recommended: john.smith@company.com
A bad NameID may:
- Cause Otter to create a new account instead of recognizing an existing user
- Change when a user’s email or attributes change, such as during:
- Name changes
- Domain migrations
- Mergers and acquisitions
- Email alias updates
- Result in duplicate user accounts
- Lead to loss of access to data
- Require administrators to spend time cleaning up user accounts
Is there a logo I can download for the application?
- Yes. You can download this image or the one linked at the bottom of this article.
Feedback
0 comments
Article is closed for comments.